
Issue
In Arizona, crash data is available to participating agencies through the ALISS Safety Data Mart. By following the steps included here, you can create data files suitable for import into Crash Magic.
Explanation
The instructions in this article are for obtaining data for Crash Magic from the AZ ALISS data warehouse website. The ALISS website provides access to many reports and data downloads. Only one of those download selections will create data suitable for use in Crash Magic. Any other selection will produce errors.
Important: Pd’ Programming does not have an account to access the ALISS system. This article was created by watching a client navigate the system. If the interface changes, or if you have suggestions on how to improve the article, please let us know. (help@pdmagic.com)
Note: Instructions for importing ALISS data into Crash Magic are available at Importing New Crash Data – W/Convert
Solution
Steps for downloading data from ALISS web site:
- You will have been provided with a login to a “virtual machine” (VM) on the DOT server. Start by logging in to that VM using the ADOT login you were provided.
- Use the browser in that virtual machine to log into the ALISS web site, again using the ADOT login you were provided.
- From the main screen, you will have a number of links at the top for selecting queries and reports. Select the option “Safety Data Mart – Ad Hoc Query Wizard”. A list of “Standard Query” options will be displayed below.
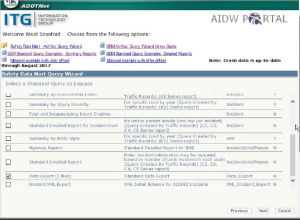
- Scroll down the list of queries to “Data Export (3 files)”. Place a check-mark to the left of that option to select it. Click the “Next” button at the bottom of the form.
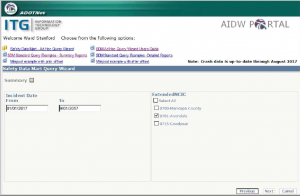
- The next screen provides the ability to choose your desired date range and jurisdiction. (ExtendedNCIC) Depending on your arrangement with the DOT, you will have one or more ExtendedNCIC values to choose from.Select all that you are interested in having available for analysis in Crash Magic. Again, click the “Next” button at the bottom of the form.
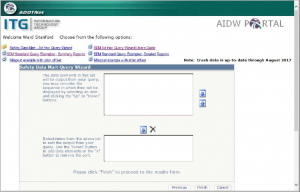
- The next screen appears to be a place to select fields for listing and sorting. Since you want all the fields, and the sort order does not matter, ignore these settings. (they will be blank) Click the “Finish” button at the bottom of the form.
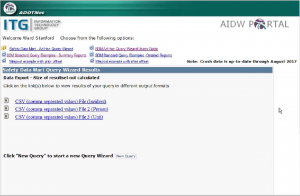
- When the query is complete, you will be presented with links to download the three CSV files.
- Crash Magic requires these three files, and requires them to be named and packed in a zip file. Start by creating a temporary directory on the desktop of your VM. (you can call it “CM”) You will download the files here.
- Click the “CSV (comma separated values) File ( Incident )” link. When prompted, choose to save this file to the CM folder on your desktop. Name the file “ Incident .txt”. This is important, as the three files will all have the same name otherwise.
- Click the “CSV (comma separated values) File ( Person )” link. When prompted, choose to save this file to the CM folder on your desktop. Name the file “ Person .txt”.
- Click the “CSV (comma separated values) File ( Unit )” link. When prompted, choose to save this file to the CM folder on your desktop. Name the file “ Unit .txt”.
- Open the CM folder on the desktop and select the three files you have saved there. Once they are selected, right click on the selected files and choose “Send to” and then “Compressed (zipped) folder”. The files will be zipped together and placed in a new file with a zip extension. Give the zip file a name appropriate to its content. (i.e. Crashes2014-2017.zip)
- Now, you need to get that zip file back to your own desktop from the VM. We’ve seen a couple of solutions for this.
- One client opened the Outlook program on the VM; logged in to their local agency account; and created an email to themselves. They then attached the Crashes2014-2017.zip file and sent the email.
- Another client had their local c: drive available in the list of connected drives in the VM. In that case, all that was needed is to copy the zip file to the local c: drive from the desktop. (when this option is available, you can use your own c: drive instead of the VM desktop for the download process and avoid a few steps)
- At this point, you have the data file you need.
- In the ADOT VM, log out of the ALISS web site.
- Delete the CM folder from the desktop.
- Finally log out of the ADOT VM
- You many now proceed to the instructions for importing the new data into Crash Magic:
Importing