
Issue
Map Magic 2 for ArcMap is an Add-In for ESRI ArcMap software (versions 10.3 and later). It allows you to create Crash Magic studies and reports from within ArcMap via Crash Magic’s REST interface. This article includes information on the process of installing Map Magic 2 for ArcMap.
Explanation
The Map Magic 2 for ArcMap Add-In will be installed via the Add-In Manager. After installation, the Add-In needs to be configured. Please see http://pdmagic.com/kb/ShowKBArticle.cfm?id=319
Solution
Steps to install Map Magic 2 for ArcMap:
- Download and run the Crash Magic Desktop Utils installer
- Navigate to http://pdmagic.com/clients/downloads.cfm. (This site requires you to login. Contact Pd’ Programming if you do not have an account.)
- On the right panel, select the “Downloads” link. Under “Utilities and Add-ins”, select, download and save “CrashMagicDesktopUtils.msi”.
- Run the MSI installer. The MSI includes multiple Crash Magic-related utilities that may be useful to you. At a minimum, please select and install Map Magic. It will copy the Add-In (MapMagicForArcMap10REST.esriAddIn) to C:Program Files (x86)PdMagicCrash Magic Desktop UtilitiesMapMagic.
- Uninstall any existing Map Magic Add-Ins (Important)
- Open ArcMap.
- Select Customize > Add-In Manager…
- Identify any existing Map Magic Add-In. Select the Add-In by clicking on it and then click “Delete this Add-In”. Often there will be multiple instances of the Add-In. Repeat selection and deleting until there are no Map Magic Add-Ins remaining.
- Close ArcMap.
- Install the Map Magic 2 Add-In
- Open ArcMap.
- Select Customize > Add-In Manager…
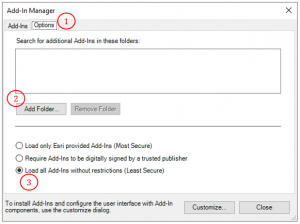
- Select the Options tab (1), click “Add Folder…” (2), then navigate to and select the folder where the Add-In was installed (C:Program Files (x86)PdMagicCrash Magic Desktop UtilitiesMapMagic). Select the radio button “Load all Add-Ins without restrictions (Least Secure)” (3).
- Click the Add-ins tab. You should now see “MapMagic2ForArcMap” under Shared Add-ins.
- Click Close to close the Add-In Manager.
- Add the toolbar to ArcMap
- Select Customize > Toolbars, and select “Pd’ Map Magic 2”.
- The toolbar should appear in the ArcMap toolbar area.

You are now ready to configure login and advanced settings for Map Magic 2 for ArcMap. Please see http://pdmagic.com/kb/ShowKBArticle.cfm?id=319.