
Issue
Map Magic 2 for ArcMap is an add-in for ESRI ArcMap software (versions 10.3 and later). It allows you to create Crash Magic studies and reports from within ArcMap via Crash Magic’s REST interface. This article includes information on the initial setup of Map Magic 2 for ArcMap, including how to configure the user login and advanced settings options.
Explanation
Map Magic 2 for ArcMap requires initial setup of login information, layer and field names, and Crash Magic study definitions.
- The login information is used to login to the Crash Magic REST interface, and also the MagicAuto interface if you use Map Magic to launch Crash Magic in a browser.
- The ArcMap layer information is required to access field data from your crash data layer (case id), your street centerline layer (street names), and any node layer (node id) you choose to add.
- Map Magic 2 can gather data in four ways, matching four study types in Crash Magic. Your agency may have only some study types configured in Crash Magic. Study definitions are required to connect to any available study types in Crash Magic:
- Case Id
- XY Rectangle
- Crash records must have coordinate data.
- Intersection
- Crash record street names must match street names in your ArcMap street centerline layer, or be properly aliased in Crash Magic.
- Node
- Crash records must have associated node data.
Once initial login and layer information is set, you will only need to reset this information if your login changes, or if your layer or field names change.
If all users in your agency share the same ArcMap layers, a Crash Magic administrator can move the Map Magic Settings created here to your agency’s shared account. In this case, each subsequent user must only enter their login information. The layer settings will be read from the shared configuration.
Solution
Before You Begin
- This document assumes you have installed Map Magic 2 and have added the “Pd’ Map Magic 2” toolbar to ArcMap. (Please see http://pdmagic.com/kb/ShowKBArticle.cfm?id=273)
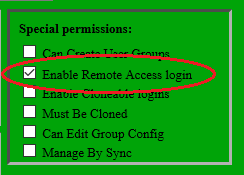
- All users that use the Map Magic 2 add-in must have “Remote Access” privileges assigned to their Crash Magic account. This can be set by a Crash Magic administrator on a user’s “Settings” tab.
- Login information must be completed before entering the Advanced Settings.
Map Magic 2 Login
-
- Select the User Login button on the Map Magic 2 toolbar.
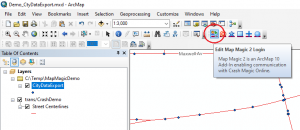
- Select the User Login button on the Map Magic 2 toolbar.
- In the User Login dialog, enter the following information:
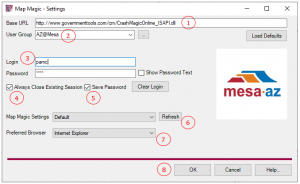
- Set the proper Base URL for your version of Crash Magic. (The default should be acceptable for most hosted users)
- Select your user group (the same as your Crash Magic user group).
- Enter your login and password (the same as your Crash Magic login and password).
- Select “Always Close Existing Session”. This ensures that if you are logged in to Crash Magic from the browser, Map Magic 2 will end that session before starting to interact with Crash Magic. No data or work will be lost in Crash Magic.
- Select “Save Password”. Password is saved locally and securely. If you do not choose to have Map Magic 2 save your password, you must re-enter it every time you create a new study.
- Click the “Refresh” button next to the Map Magic Settings drop-down menu. This will create a new entry in your Crash Magic account to store information about your Map Magic settings, including the layers and study definitions you set in the Advanced Settings dialog (next section).
- (Optional) Choose your preferred browser if you plan to launch an interactive Crash Magic session from Map Magic 2.
- Click “OK” to save your login information.
Map Magic 2 Advanced Settings (Layers and Study Definitions)
-
- Select the Edit Advanced Settings button on the Map Magic 2 toolbar.
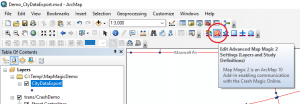
- Select the Edit Advanced Settings button on the Map Magic 2 toolbar.
- In the Advanced Settings dialog, enter the following information:
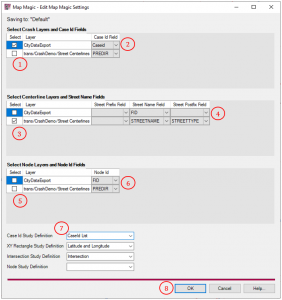
- Click the check box next to the name of your crash data layer. If you have more than one crash data layer, ensure each one is selected.
- Select the name of the Case Id field for each selected crash data layer.
- (Optional) If you have a street centerline layer, click the check box next to the name of the layer.
- If you set a street centerline layer, select the appropriate fields for street name. For example, if the full street name is contained in a field called “FULLNAME”, select that in the center column titled “Street Name Field”, and leave the prefix and posfix blank. If your full street name is split between multiple fields (e.g., “North Main Street” is created by a prefix “North”, a street name “Main”, and a postfix “Street”), enter the name of the prefix field under “Street Prefix Field”, the primary name field under “Street Name Field”, and the postfix field under “Street Postfix Field”.
- (Optional) If you have a node layer and associated nodes in your crash data, click the check box next to the name of the layer.
- If you set a node layer, select the name of the Node Id field.
- For each study type you wish to use (Case Id, XY Rectangle, Intersection, Node), select your preferred study definition. Study definitions will only be populated if your Crash Magic instance is configured for that method of querying data.
- Click “OK” to save your layer and study definition information.