
Issue
This article describes how to export coordinate data from Crash Magic for import into ESRI’s ArcMap software.
Explanation
Crash data with coordinates may be exported from Crash Magic and imported into ArcMap. This allows interacting with crash data in the ArcMap interface, including the ability to use the Map Magic 2 for ArcMap add-in. Map Magic 2 for ArcMap exposes Crash Magic functionality within the ArcMap interface so you can select crash data in a variety of ways to create Crash Magic studies and reports.
Solution
There are two steps to this procedure:
- Export crash data with coordinates from Crash Magic.
- Import crash data with coordinates into ArcMap and create a selectable feature class.
Export Crash Data with Coordinates from Crash Magic
- Create an All Data or Date Range study in Crash Magic. Select your start and end dates.
- Create a listing report. Click on the Field List button, and create a new field list containing your fields of interest. At a minimum, the Case Id, Latitude (Y Coordinate) and Longitude (X Coordinate) fields must be included. Select the new field list for your listing report.
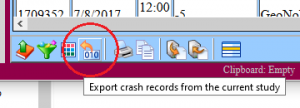
- Click the Export button at the bottom of the report.
In the “Export Study” dialog, select your new field list containing coordinate fields.
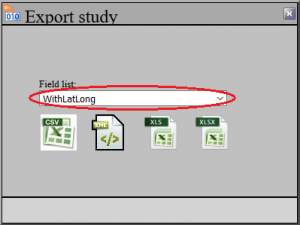
You have two options for export format:- CSV. Recommended if your Case Id field has non-numeric characters, or is strictly numeric with no leading zeroes.
- XLS. Recommended if your Case Id field has numeric characters with any leading zeroes. (Note: ArcMap will trim off any leading zeroes during import of a CSV formatted file). If you choose the XLS format, you may need to open and save in Microsoft Excel before importing to ArcMap, to clear any read-only flags on the file.
Save the file.
Import Crash Data with Coordinates into ArcMap
(Note: These steps are for ArcMap 10.3.1. Other versions may have minor differences. For the most up-to-date import steps from ESRI, please see http://desktop.arcgis.com/en/arcmap/latest/map/working-with-layers/adding-x-y-coordinate-data-as-a-layer.htm and select your version of ArcMap. )
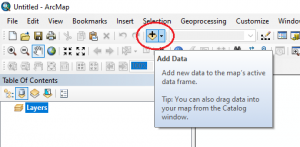
- Open ArcMap. Click the Add Data button (or File > Add Data > Add Data…). Select the CSV or XLS file you saved from Crash Magic export process.
- The data has been added in the Table of Contents. Right click on the CSV or XLS, and select “Display XY Data…”.
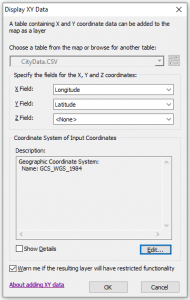
- Select your X (Longitude) and Y (Latitude) fields from your data. If the coordinate system is not selected, click the “Edit…” button, and select the correct coordinate system for your data. If your data is “standard” latitude and longitude, you can search “4326” to select “WGS 1984” as your geographic coordinate system. Click “OK” to set your coordinate system, then “OK” on the “Display XY Data” dialog. (You may get a warning that the table does not have an ObjectID. This will be handled in the next step.)
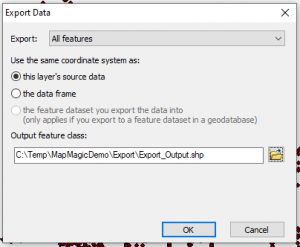
- You will now have an “Events” layer added to your Table of Contents. Right click the “Events” layer, then select Data > “Export Data…”. Select “All features” and the same coordinate system as the layer’s source data. Select an output file: a shape file or a geodatabase feature class. Click “OK”. Add the exported data to the map as a layer.
- The exported crash data points are now selectable as features. You can now remove the CSV or XLS layer and the “Events” layer from the Table of Contents.